Monday, November 15, 2010

The Best Laid Plans

I have my knitting all planned out, I'm totally in love with my Farmer's Market Cardigan, and I'm making great progress on it. I've divided for the front and back and arm holes. It is mainly stockinette with some shaping right now, so it is fantastic tv knitting. I'm totally and completely content with the project.


So, of course, something has to go wrong, something that will stall my progress and wreck havoc with all of my plans. You know, something that looks a lot like this.


A broken knitting needle. Besides the interruption to my knitting, which is never appreciated, I also have the loss of a beautiful needle (it is hard to tell from the photo, but these needles are truly a work of art, in multicolored wood). Needless to say, my Farmer's Market Cardigan has been halted.


While this would seem like the ideal time to make some real progress on the Yggdrasil Throw, I decided that it was probably a good sign that I should get going on the Slip Stitch Baby Blanket, destined for my niece that is due in February. I would like to have it ready to go for Christmas. Plus, if I am being completely honest,  the Yggdrasil, I'm in the middle of a complicated cable section and isn't great tv or distraction knitting. It might be better to save it for this weekend, seeing as husband will be gone for deer hunting. That will be a great opportunity to turn off the tv, turn on the iPod and ignore the world while I focus on the cabled section of the Yggdrasil.

In the meantime, I've started the baby blanket and am already annoyed by the progress. It is a cute pattern, but the slip stitch design seems to take forever to make any progress. I'm also not too sure about the color combination. sometimes I think it is cute, and sometimes I just think it is okay. I do like how the pattern is turning out to be reversible, which is a plus with multicolored blankets. As an added plus, the Shine Worsted yarn is a pleasure to work with and is super soft and squishy. Hopefully I will finish in plenty of time, replace my broken needle and get back to my preplanned knitting.


I'm also making less than ideal progress on my pair of socks a month goal I set for myself in January. I did well through July, but then life got in the way. Since the start of August, I have finished a pair of socks for my oldest niece, and have just started on the leg of a second pair of toe-up socks. The pattern is Nagini, it Turtle Multi Essentials yarn (now known as Stroll sock yarn) from Knit Picks. Stroll is super soft, comes in great colors, gets better with wear, and is quickly becoming my favorite sock yarn. This pair will be pair number 9, completed in the 11th month, and somehow I don't see myself completing 3 more pairs by the end of the year.


Maybe I'll give the sock goal another try next year, or maybe I will try to set a different goal for the next year. I would also like to get some wash clothes made, 12 in a year would be doable. Or, I could start my mini-mitten advent calendar, which would work out to 2 mittens a month. I'll have to think about it some more and see.

Wednesday, November 3, 2010

Winter Knitting

For me there is something almost romantic about knitting in the fall and winter. It is what knitting was made for, it's what you think about when you think about knitting: cozy sweaters, warm mittens, hats, scarves, blankets, slippers, wool yarns, etc. Don't get me wrong, I love my light airy summertime knit tanks, and my cotton cardigans that help in the transitions between seasons, but fall and winter are the knitting seasons.


Farmer's Market Cardigan, Ignore the bottom part, that's my
version of a provisional cast on.

Thanks to  my stash inventory awhile back, I was aware of the glorious wool yarns I had waiting for me when this season struck. And once again, I have more projects planned than I could ever dream of having time to complete.

My main project on my needles is a perfect winter project: The Farmer's Market Cardigan. It's a hip length, long sleeved cardigan, with some beautiful cabling detail, knit up in a soft, squishy, and gorgeous tweedy rust colored yarn.

My second project on the needles has been neglected for some time now, but I figured this would be a great time to blow the dust off the pattern and start knitting again. The Yggdrasil Throw was originally meant to be a wedding gift for one of my oldest and dearest friends. I started it in plenty of time for the wedding, but the project went into hibernation when she called off the engagement last summer (no reason to work on a big heavy blanket in the summer if I don't have to, right?). It is an intricately cabled afghan with a tree of life motif, surrounded by Celtic style cables. I'm making it in an Orange-brown acrylic yarn, not my first choice for fibers, but it was a gift and needed to be easy care. While acrylic yarn isn't exactly a winter fiber, a big, heavy blanket is perfect to work on during those long, cold, snowy evenings. I have absolutely no idea what to do with the blankets once it is finished, but like any project, it deserves to be completed.

Next on deck, and needing to be started sooner, rather than later, is the Slip-Stitch Baby blanket. This is not really either a winter project or a winter fiber (it's in a cotton/model blend, easy care and so soft) but needs to be completed before the birth of my niece in February.

After that, I have a long, long list of projects ranging from mittens to sweaters in a variety of beautiful, squishy yarns. There can't be many better ways to pass cold winter's evenings than with a warm pile of wool yarn.

Thursday, October 28, 2010

The Wonders of Felting

Non-knitters may not be familiar with the term felting, but anyone who has even thrown a wool sweater in the washing machine and had it come sized to fit a small dog, is familiar with the concept.  Being familiar with the concept, people may wonder why any knitter would purposely do that to their work. However, felting is a great method to turn something that looks like this:


Into something much more useful, like this:


Felting also creates a more sturdy fabric, making it perfect for things like slippers. (Kindly ignore the leaf pieces on the slippers, I wore them outside a couple times while chasing after the dog in the backyard)


Felting is a process that can be done with most animal fibers, like wool. The secret is that the shaft of the animal fibers are covered with little scales. When exposed to heat, these scales tend to start to stick out. Fiction with make the scales from several fibers start to stick together, eventually forming a felted material. 


In addition to the shrinking wool sweater, another commonly experienced example of this would be the matted hair that you sometimes find on animals, or matted human hair, for that matter. It is all the same concept. 


Slipper Pieces Pre-felting
Felting can be a little tricky. Felting shrinks the material, can be a little unpredictable, and is not reversible. This causes me to admire the good people who write patterns involving felting.


Despite these things, the actual process of felting is not difficult. You start by creating your knitting. It usually looks pretty loose, big, and floppy. At best, pre-felted pieces bear a distant resemblance to the desired finished product, and the fact that felting shrinks the pieces more lengthwise than width wise often creates an awkward looking project.


Then, you take your precious knitting and load it into a pillowcase (I use a zippered one). Close up the top.


Prepare your washing machine for felting. You want to set the water temperature to hot, select the lowest possible water level and add some materials to create friction, some people use tennis balls, some use jeans, I usually use towels. Add a small amount of detergent, and start the machine. Take a deep breath and toss the knitting into the machine.


Once the machine starts to agitate, check on the progress frequently. I usually check somewhere between five and ten minutes. Checking this often gets annoying, but it you shrink your item too far, it cannot be undone.


Don't let the machine go into the spin cycle, you'll end up with creases in your project. Depending on how long the process is taking, you might need to restart the agitation cycle. 


Once the felting has completed, take the pieces out of the pillowcase and rinse them in cold water. Stretch the pieces into the desired shapes and set them out to dry. To get the slippers into a good shape, I used newspapers and the plastic inserts that store put into shoes to help them keep their shape. Let the pieces dry, which depending on the humidity, can take up to several days.


Enjoy the finished result and smirk because you've learned another knitting technique.


Tuesday, September 21, 2010

Inventory

Fall is here and winter is on its way! This is extremely good news for me, seeing as I hate summer (I can see my friend Emily shaking her head at this, she's a summertime girl). I'm thrilled to see the arrival of cooler weather, and the return of cool weather knitting.


For those non-knitters, the idea that there is summertime knitting and wintertime knitting most likely seems odd. But consider this, when it is 90 degrees outside, do you really want to have a wool sweater in your lap? Yeah, I didn't think so. Summer is a great time to work on things like socks and lace or projects made of lighter yarns, like cotton or linen. Currently, I'm trying to finish the Hey Teach! Cardigan, which is a great summer project. A short-sleeved, half lace, cotton cardigan. I've finished the back, and am almost done with the right front, so I should be done soon.


This means that I can start on some winter projects. Yesterday, I flipped through some patterns on Ravelry, and found a bunch of things that I would like to make. Then, I started to look for yarns to go with them, but I remembered that I was trying to use up some of my stash. However, I cannot remember what I have in the stash, and if I have yarn assigned to a project or not. 


I've used the stash feature on Ravelry awhile ago, but by now I only have odds and ends in there, and I cannot be sure that the yarn I have listed is at all accurate. This led me to spend about an hour today redoing the stash list. At least I have the yarn mostly organized by weight and all the skeins of the same color grouped together. This made the process a lot easier.


I wrote down the type of yarn, colorway, and number of skeins. I also made notes if I have the yarn planned for any project. Then I entered the info into the Ravelry database. Tada! I now have a list that I can reference when browsing patterns.


Time to start planning my winter knitting.

Wednesday, September 1, 2010

Photo Shoot for After Hours Shawl

I've been toying with the idea of doing lace for some time now. I've even gone as far as to cast on, knit a bit, and then get discouraged and give up. So, I thought a Knit-A-Long (KAL) might just be the way to get one done.

One of my favorite places to order sock yarn, Knitter's Brewing Company, sponsored a KAL for a lace shawl to showcase their newest yarn. I immediately decided to join, the KAL officially begins today, September 1. But I got a bit of a head start.

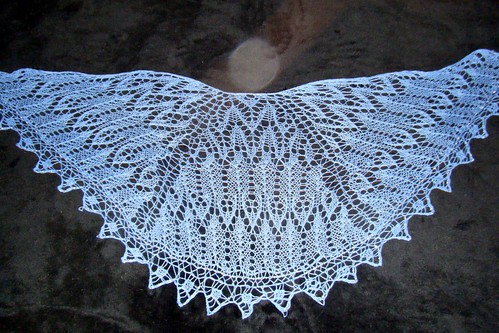
AfterHours3

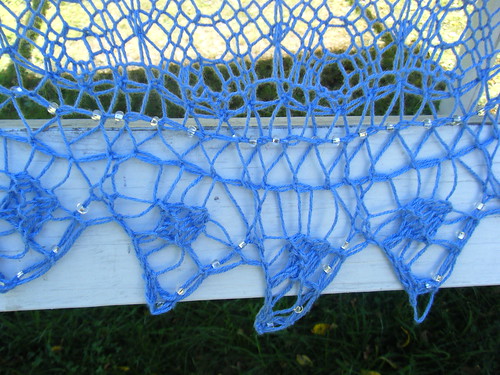
Yup, that is a completed lace shawl, with a beaded border.

AfterHoursDetail

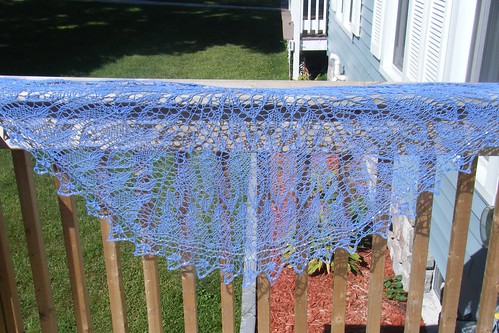
Now, we have just moved. At the old house, I had my go-to places where I knew I could get good photos of my knitting. Now, I have to invest some time into finding new locations for my projects. First, I tired the back deck...

AfterHours1

Not too bad, the color came out great, but I thought that a solid background might be better for the lacework, so I tried some on the grass. Those didn't turn out at all. I tried the ladder leading up to the playhouse, but the lace didn't show up at all (this is, however the spot where I got the lovely close up of the border, which is the closest to the yarn's true color). Then I tried the front porch, same problem.

Finally, I headed back inside and took some using a plain, black background...


The black worked well for showing off the stitch detail, but the color seems kind of washed out in it. And what's with the orb in the picture? It showed up in every inside picture I took of the shawl. Perhaps we have a ghost that really likes my knitting (I could live with that). Eventually, I came to the conclusion that lace work is trick to photograph, and I'd have to just keep trying.

On another note, I'm giving myself a pass on the August socks for my pair a month club, I've been busy moving and unpacking. This year I'll settle for 11 pairs in 12 months and call it good. I'll try to squeeze in extra pair in the next four months, but I'm not sure if I'll manage that or not. Time will tell.

Friday, August 27, 2010

Whew! And Home Updates.

I sat down today to look at my blog, and realized that it has been over a month since I last posted. This has been a rough summer for blogging. Now, things are slowing down a bit, so I'm going to make an effort to stay caught up on my blogging.


The main reason for the lack of posts is this...


our first home! Husband and I had been talking about and playing around with the idea of buying a house for sometime. We spent time prowling the  real estate websites, looking for the perfect place.


We had a pretty long list of both "needs" and "wants" including 3 or more bedrooms, 2 or more baths, all the bedrooms on the same floor, either newer construction or remodeled  (husband and I are not the "fixer upper" types), central air, dishwasher, good yard, quiet street, etc. Then this place was posted. It's an old farmhouse, but has been completely redone inside and out. And it was pretty much love at first sight for us. Then we noticed this in one of the 


website photos. (Check out the refrigerator magnets) It appeared that the fates were telling us to buy this house (upon closer inspection, I was unable to tell if the magnets actually did spell out CRAM or CBAM, but either way, it's a pretty good coincidence. Plus , as an added bonus, it met almost all of the requirements on the list. 


So then began the process of making offers, applying for loans, home inspections, loan underwriting, and closing. 


However, after all that hassle, we moved into our first house at the beginning of August. Moving was fairly uneventful, except for the box spring not fitting up the stairs. Thankfully, a family friend was able to take it apart and reassemble the box spring upstairs. We've been busy unpacking and cleaning up the house we had been renting (turned in the keys to that place yesterday). It has been a lot of work, with plenty of work still left to do, but it all has been worth it. 


Wednesday, July 7, 2010

Steps to Blocking

The frock camisole is done! It is currently drying on my blocking board, where I am hoping it will block out a little longer.

If you are not a knitter, (and even if you are) you may be wondering what blocking is. It is the final step in finishing a knitting project. Well, most knit projects, blocking only really works with natural fibers (those from plants (linen, bamboo, cotton, hemp) and those from animals (wool, silk), man made stuff doesn't really block out.

Anyways, blocking is the process of shaping the finished piece into the desired shape. This looks different depending on the fiber used. For example, you can take a wool sweater, dunk it in water and tug and pull to your heart's content and really control the finished product (this will work with a purchased wool sweater too), but cotton is more delicate when wet, so the process is different. At any rate the usual blocking process involves wetting the knitting (dunking, spraying, steaming), pulling and pushing, and pinning it into the desired shape and letting it dry.

However, here are my steps for blocking the frock camisole.

  1. Wash the tank in Woolite. Rinse out the tank and lay on a towel.
  2. Roll up the towel and toss into the washing machine, turn it to the spin cycle (this spins out the extra water without damaging the fabric).
  3. While the piece is spinning, get out the blocking board, remove the build up of cat hair from the board.
  4. Remove tank from washer and start shaping it onto board.
  5. Curse when you realize that the blocking pins are not in the bag with the blocking board. Proceed to search the house and find the pins on the dining room table.
  6. Pin down the front yolk of the tank, and decide the let the rest of the front hang and dry, since it is supposed to be drapey and you are hoping that gravity will do the stretching for you.
  7. Start to pin down the straps, curse again when you realize the you twisted one of the straps when you attached get. Get the scissors.
  8. Curse more aggressively when you realize that instead of removing the stitches attaching the strap, you really cut the first row of knitting.
  9. Run around like crazy to find a needle and thread to stop the unraveling.
  10. Finishing pinning the straps, pin the back yolk.
  11. Let the piece dry while at work, plan on fixing the strap snafu later.
  12. Sigh and reflect upon your own stupidity.